DIY Homemade Lawn Aerator For a Lush Lawn
Gardening can be an expensive hobby, and if you’re able to cut corners and make some gardening supplies at home, all the better.
Thankfully, a homemade lawn aerator is one of those projects that could save you money and give your lawn what it needs.
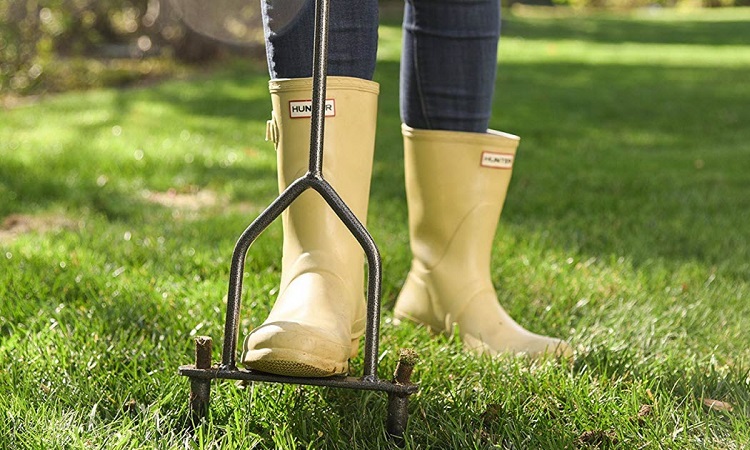
How do you make a lawn aerator? Lawn aerators can be fashioned using spikes attached to some sort of base, whether it’s a rolling cylinder or the bottom of a shoe. The goal of aeration is to puncture holes in the ground and reduce soil compaction, so there are lots of DIY projects available that make the process easy. Lawn aerators can be expensive, so if you fancy yourself handy you can create one yourself at home.
This could make your lawn maintenance a much less costly endeavor.
We’ll show you how to make a DIY aerator that does just as good of a job and why it’s so important for a luscious lawn.
Why Should You Aerate Your Lawn?

As the soil is responsible for delivering nutrients to our grass and ensuring that the roots get access to air and water, it needs to be in the best position to do this.
Unfortunately, most soil types will become compacted over time, either because of their natural composition or because they’ve been pushed down with heavy foot traffic and lawn machinery.
The purpose of aerating is to alleviate this soil compaction by making small holes in the ground.
Once these holes have been made, the roots of the grass and the soil underneath will be able to access the nutrients, fertilizer, water, sunlight, and air they need, so they can thrive and be healthy.
Aerators are made with either solid spikes or ones with a hollowed-out core.
Experts believe that core aeration is the best approach as it removes solid soil plugs from the ground rather than just compacting it further, but a spiked aerator can still be effective at loosening up the soil under your grass, and they’re the easiest type to make at home.
Can You Make an Aerator?

Lawn aerators are fairly standard pieces of equipment when it comes to gardening tools, and they’re not challenging to make for yourself at home.
Creating a basic pair of aerating sandals can be easily done by securing nails to a solid base and then wearing them on the sole of your footwear, but this type of aeration can take a while to cover the whole lawn area.
A rolling aerator is one that’s pushed along by the operator holding a handle, with the spikes rolling along on a cylinder shape and piercing the ground as it goes.
These make it easier to cover more ground in a shorter time and with less physical effort to get the spikes to burrow into the ground, so if you plan on creating a homemade aerator, this is the best type to have.
Other simple alternatives involve fastening spikes to a shovel so they can be pushed into the ground by hand.
However, this requires more physical effort and may take all day to cover your lawn entirely, so it should only be used by gardeners with less ground to aerate.
Tools and Equipment Needed
- Empty solid bucket (sheet rock or similar product)
- Solid nails or railroad spikes
- Powdered concrete
- Copper pipe
- Lawn mower handle
- Axle and axle caps
- Washers
- Drill
- Hammer
Simple Steps for a DIY Rolling Lawn Aerator
- Drill holes around your bucket, aiming for around three inches of space between each hole. These will form the holes where the spikes will go.
- Make a mark at the bottom of the bucket in the center.
- Insert your chosen spikes into each of the holes with the pointed end sticking out of the bucket.
- Drill a hole into the bottom of the bucket where you marked the center earlier. Place the copper pipe in the center of the bucket and slightly stick out of the end of the hole. The axle will be pushed through this later.
- Mix the concrete powder and then pour the wet solution into the bucket, being careful not to pour it into the hollow of the copper pipe. The nails will need to be positioned so that their heads are slightly inside the bucket, allowing them to secure in place when the concrete sets. You can use a hammer to push them as you wait for the concrete to dry.
- Once the concrete has been set, put the axle through the center of the copper pipe. Attach the axle to the old lawn mower handle you have, and fasten it with washers between the pipe and the handle. Place the axle caps on the end if required.
- Test the lawn aerator by pushing and pulling it to see which direction is easier. Work the aerator slowly around the yard to ensure the holes have been made properly.
DIY vs Store-Bought: Which is Best?

There are benefits to using a DIY aerator, but when you compare it to a more premium core aerator, it is lacking in some areas.
Spiked aerators have their place in the garden and can be effective with some soil types at reducing compacting, but most experts agree that removing soil plugs and not just piercing the ground is more effective.
The cost of a new aerator can be high though, which is why many gardeners are happy to stick with their homemade model.
You’ll have to consider the size of your lawn and what your grass and soil require to be at their healthiest, before deciding which approach is best.
As a gardening job that only needs to be done annually in most cases, it may work out cheaper to hire an aerator if you don’t want to take the DIY approach or purchase a new one.
However, having access to your own aerator means you can use it whenever your lawn needs, so it’s considered an essential tool for any serious gardener.
Tips for Effective Lawn Aeration

To get the most out of your new homemade lawn aerator and reap the most benefits you’re your grass, you’ll need to take some tips from seasoned gardeners on how to get it right.
Check out these hints to ensure your DIY aerator is used effectively:
- Soil moisture matters: Timing is everything when it comes to aeration, so you’ll want the ground to be not too dry but not recently wet either. Wait at least one day after rain to aerate so the ground is slightly moist, and if there’s a dry spell coming up, you’ll want to aerate the lawn in advance.
- Make more than one pass: Using a homemade aerator means it’s not going to be as effective as a professionally manufactured one. To ensure you’ve covered the entire yard and made sufficient holes, you will need to make multiple passes over the property.
- Plant new seeds: Now is the time to work if you plan on overseeding or reseeding, as having these holes in the earth will ensure they reach the soil where they need to go. The correct method is to aerate first, then throw seeds, and then cover with fertilizer or top dressing.
A Lush Lawn Without the Cost
There’s no denying the benefits of lawn aeration on your grass, but with some aerators costing hundreds of dollars, it’s not always easy to do. A DIY aerator can get you started until you’re able to afford the real deal, and your grass will be grateful for the effort.
Related Questions
Taking care of your lawn doesn’t have to be challenging, as long as you have the right tools for the job.
To find out more about the various tools and supplies that your grass requires to thrive, we’ve answered some FAQs that can help.
What Is a Power Rake Used For?
In lawn care, a power rake is used to remove debris from the soil level of the grass and reduce thatch build-up.
These machines operate with blades, like tillers, and can be rolled along on wheels as it cuts the debris gently, opening up the grass and soil to be able to absorb more nutrients.
How Often Should You Aerate Your Lawn?

Your lawn’s aeration schedule should be determined by the type of soil you have, as some require more frequent aeration.
Clay soils become compacted easily and need aeration annually, or sometimes more, but sandy lawns that don’t clump may be able to last two years between aeration.
Can You Mow Your Lawn Too Much?
Yes, it is possible to mow your lawn too often, stressing the grass and causing permanent damage when you do.
A mowing schedule will differ from season to season and depending on your grass type, and in peak growing season you should not mow more than once every seven to 10 days.
Resources:

